I have my book finished but have color pictures. For the print book, I need them to be grayscale. I tried using the grayscale when I publish as a PDF but they come out way too dark in the proof. How do I edit to lighten them in the book without redoing outside and then reloading all of them again to the book? Thanks for any insights here.
Congratulations! That’s awesome ![]()
How did you find laying out pictures–any challenges?
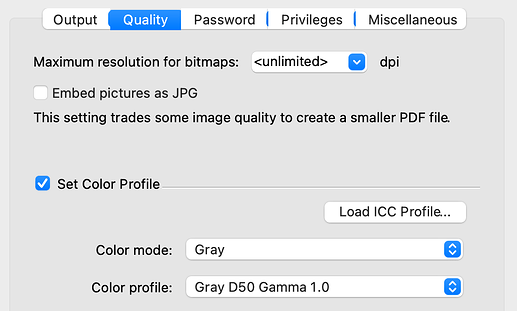
There’s no picture editor built into Papyrus Author, but for a quick fix; have you tried creating the PDF with a different color profile?
The lowest color contrast you’ll get is the color profile setting “Gray D50 Gamma 1.0”. You can change the color profile in the “Quality” tab of the PDF Export feature:
![]() This profile might make the midtones appear brighter and less contrasty, so it’s a good idea to take a good look at the pictures after creating the PDF.
This profile might make the midtones appear brighter and less contrasty, so it’s a good idea to take a good look at the pictures after creating the PDF. ![]()
If the pictures are still too dark, and you need to use an editing software, you can quickly replace pictures with these steps:
- Navigate “Insert” → “Graphics” → “Picture Catalog”
→ This will open a separate view of all the pictures in your book.
-
Right-click on a picture you want to switch out, and select “Replace with another picture”.
-
Navigate to the edited photo in your File Explorer, and double click it.
→ The picture is replaced.
![]() It’s a good idea to make sure the new pictures are the same size as the old ones, so they don’t move around your layout.
It’s a good idea to make sure the new pictures are the same size as the old ones, so they don’t move around your layout. ![]()
Hope this helps! ![]()
![]()
Pictures can also be replaced by dragging their icons from the desktop or from a Finder/Explorer window into the Papyrus document or into the picture catalog. If the file names are the same, Papyrus will ask whether to replace them.
And if the pictures are kept externally in a folder inside the project (usually named pictures), then they can be replaced in that folder directly. Close and reopen the Papyrus document see the changes there.
