I’m a new user. I like many of the features but the page numbering is driving me crazy. (I know we authors are crazy anyway.) I want to remove the last few page numbers as I am putting bio and some author notes there. I have tried looking in the manual and experimenting and no luck.
Thanks so much for your reply. It lets me know I am on the right track. Yes, I thought of that and tried but can’t figure any way to get the new master page in my document. Still looking in the manual. (It’s not very helpful) It says some about it but that doesn’t tell much and what I am guessing hasn’t worked so for.
Just below the Master Pages entry, there’s “Assign Page Range”.
The way I understand your question, this should be what you’re looking for.
Chapter 3. on the same page describes usage. Let me know, how it works out.
Thanks for your help. Yes, I tried that but it seems to apply what ever I do to the new master to all pages in my document. One of the things the manual says is click in the “gray area” and I have no gray area. The navigator section is on the left and the clipboard on right. When I try and click the tiny area of gray showing between the doc and the clipboard it just refers to the clipboard. I’m going to give up on it as I think when I turn it to a Kindle ebook it will take out page numbers. And for PDF, I have Acrobat and can change it there. Papyrus could make it so simple by just letting the “Assign page range” be where you set the pages that showed numbers and headers.
When you double click on the top, left, bottom or right margin of a page the main text frame will turn into a grey area and you will be seeing the master page layout ready for editing.
If you created a new master page or a duplicate as I described above, you should be able to scroll the window up and down to display all the different master pages in your document. The name of each master page is always displayed in the grey main text frame.
A single click into the grey text frame will get you back to normal text editing.
I would guess that you edited the Standard master page and not the new master page.
Thanks. I think I edited the standard which I have with the pages and header showing on all and a bunch of new ones I created but can’t find any way to apply standard to one part and one of the new ons to the last few pages.
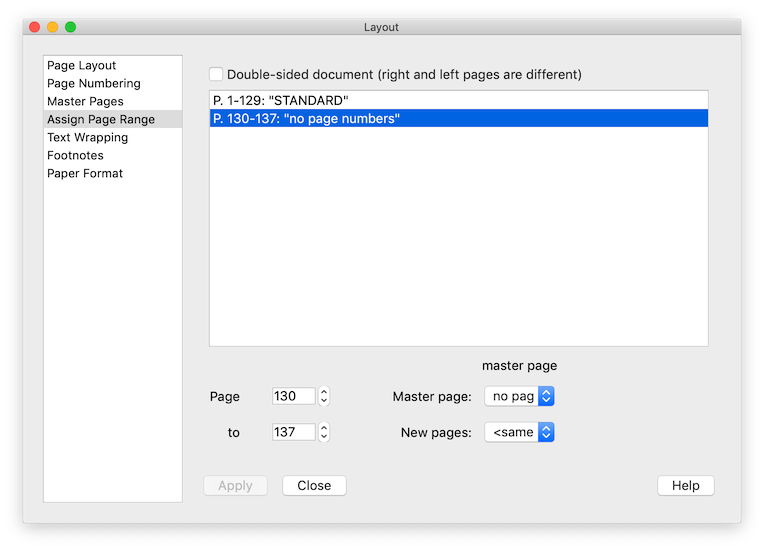
Go to the “Assign Page Range” part of the “Page Layout” dialog.
In the bottom of the dialog, enter the pager numbers of your last few pages and in the popup menu next to it select the master page which doesn’t have page numbers. Then click apply.
The text box above will reflect this change and have at least two entries – one for pages 1 to x with master page “Standard” and a second for pages x+1 to z with master page “no page numbers”
I’m having a similar problem. I imported my Word doc for my two part novel, and it created 9 master pages, plus the Standard.
I followed the instructions: (from Glucose)
Select STANDARD and click Copy (to buffer)
Click Insert (from buffer)
Rename the duplicate to “no page number” or your choice of name
Click Edit Master Page
Delete the page numbers on the “no page number” master page
Go to the “Assign page range” part of the Page Layout dialog
Edit the Page from and to fields and assign the “no page number” master page to them.
Click Apply.
I tried getting rid of all 9, and starting fresh, but the system won’t let me!
I need page 8 -Chapter 1 to start at page 1 and the page numbers centered.
Then page 131 no page number,
then page 132-end page numbers centered.
I don’t understand how to apply a specific master page to a specific page. It looks like the system wants to know if it’s a right or left page. HELP PLEASE!
As long as a master page is assigned to a document page you won’t be able to delete it. To start fresh, I would go to the Assign Page Range part of the Page Layout dialog and in the bottom part of it enter Page 1 to Page x (where x is your last page) and select “Standard” in the Master Page popup menu to the right. Then click Apply.
After this, the text box above should read P. 1–x: Standard, Newly added: Standard. Now you can select the unwanted master pages in the Master Page dialog and delete them.
First, go to Page Layout dialog and change the size of the of the header or footer area where your page numbers should go (say 0.5 inches). Don’t forget to click Apply.
Then double click on the header or footer area that you just created (it’s invisble, but you probably know where it should be). The main text will turn into a grey rectangle because you are now editing the master page.
Right click in the header or footer text frame and select “Insert page number” – a #-Placeholder will appear. Format the placeholder as needed (centered justification, font, font size, etc.). Click in the grey rectangle to get back to the main text. You should have numbered pages now, starting at 1.
Go to the Page Layout dialog again and select Page Numbering on the left side. Change the field “First page is number:” to -6. Keep the “Headers and footers start at:” 1. Click Apply. Now the first 7 pages (numbered -6, -5, -4, -3, -2, -1, 0) will not display headers and footers nor any page numbers therein, and the 8th page will start with page number 1.
For this you need a master page without page numbers as described earlier in this thread. Then go to the Assign Page Range dialog and in the bottom of it change Page 131 to 131 and select the “no page number” master page to the right. Then click Apply. Before you do this you might want to ckeck if the original page 131 has a different number now because you changed the page count previously.